HP Sprocket Studio - Setting Up the Printer

This document is for HP Sprocket Studio and the HP sprocket app.
To start using your printer, install the HP sprocket app, and then remove the printer from the box.

Step 1: Download the HP sprocket app

Install the HP sprocket app on your mobile device. The app is required to print photos.
  1. Go to the HP Sprocket (in English) homepage, and then follow the on-screen instructions to download and install the app.
  2. On your mobile device, open the Bluetooth settings menu, and then make sure Bluetooth is enabled.
  3. Android devices: On your mobile device, open the Location or Location Services menu, and then make sure the setting is turned on.
    note:
    You can turn the setting off when you are not using the printer.
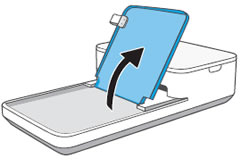
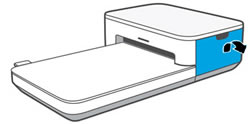
    Location menu example on Android

Step 2: Unbox the printer and connect the power cord

Remove the printer from the box, connect the power cord, and then turn it on.
  1. Remove the printer from the box, and then remove any packing material and tape from the printer.
  2. Set the printer on a clean, level surface with at least 12.7 cm (5 in) clearance behind the printer to prevent paper jams and printing issues.
    Setting the printer on a surface with adequate clearance behind the printer
  3. Connect the power cord to your printer, and then plug it into a wall outlet. Make sure the power cord does not block the output slot behind the printer.
    Connecting the power cord to the printer
  4. Press and hold the Power button until the Status Indicator light turns on.

Step 3: Load HP Sprocket Studio photo paper

Load 100 x 148 mm (4 in x 6 in) genuine HP Sprocket Studio photo paper into the paper tray.
  1. Open a single pack of HP Sprocket Studio photo paper. Avoid touching the glossy side of the paper to prevent print quality issues.
    Example of touching the glossy side of the paper
  2. Open the paper tray cover.
    Opening the paper cover
  3. Hold the photo paper by its sides, and then load it into the paper tray with the HP logos facing down.
    note:
    Loading more than a single pack of photo paper can cause paper jams and printing issues.
    Loading paper into the paper tray
  4. Close the paper tray cover.

Step 4: Install the cartridge

Install the HP Sprocket Studio cartridge that came in the box with your printer.
  1. Remove the cartridge from its package.
      caution:
    Do not touch the ribbon on the bottom of the cartridge. Fingerprints on the ribbon can cause print quality issues or damage the cartridge.
  2. Open the cartridge door.
    Opening the cartridge door
  3. Insert the cartridge into the slot until it clicks into place.
    Inserting the cartridge
  4. Close the cartridge door.

Step 5: Pair the printer and mobile device

Use the HP sprocket app to pair the printer to your mobile device.
  1. Open the HP sprocket app.
  2. If a Welcome screen displays, tap the setup option, and then follow the on-screen instructions.
  3. Tap the Menu icon , tap sprocket, and then tap Manage Printers.
    • If your printer displays in the list, the printer connected successfully.
    • If your printer does not display in the list, tap Add New Printer, and then tap your printer name.
    You can now send print jobs to your printer.
If the app is unable to pair with the printer, go to Printer Does Not Connect or Print for more information.

Step 6: Charge the HP Sprocket Studio Power Bank (optional)

Charge the optional HP Sprocket Studio Power Bank before connecting it to your printer.
  1. Connect the power cord that came with your printer to the power bank.
    Connecting the power supply to the power bank
  2. Charge the power bank until all four Charge Status lights are white, and then disconnect the power cord.
      Location of the Charge Status button and lights on the HP Sprocket Studio Power Bank
    1. Charge Status button and lights
  3. Unwrap the power bank cord, and then connect it to the printer.
    note:
    When you are not printing, disconnect the power cord to help extend battery life.
    Using the power bank to power the printer
Double-click to edit...