- Laptops & 2-in-1s
- Business
- Premium
- Gaming
- Laptops
- ZBook Workstations
- Convertibles &
detachables - Deals
- Printers
- Home &
home office - Business
- Sprocket
- Print
only - Multifunction
- Scanners
- Large format &
digital presses
- Laptops & 2-in-1s
- Business
- Premium
- Gaming
- Laptops
- ZBook Workstations
- Convertibles &
detachables - Deals
- Printers
- Home &
home office - Business
- Sprocket
- Print
only - Multifunction
- Scanners
- Large format &
digital presses
HP Sprocket 2-in-1s - Taking Instant Photos (Camera Mode)
This document is for HP Sprocket 2-in-1s in Camera Mode.
Use Camera Mode on the Sprocket to take and print instant photos with the camera. If you have not yet set up the Sprocket, go to Setting up the Sprocket.
Take an instant photo
Turn on Camera Mode by opening the Viewfinder, and then take an instant photo.
-
Load HP Sprocket Photo Paper.
-
Turn on the Sprocket, and then press down on the Viewfinder.The Viewfinder opens.
caution:
Do not pull up on the Viewfinder or try to pry it open. This can break the locking mechanism.-
Press down on the Viewfinder
-
The Viewfinder opens
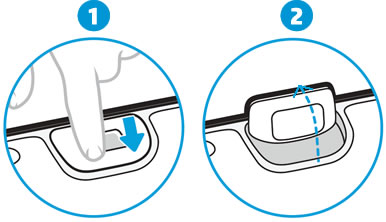
-
-
Raise the Viewfinder to your eye, and then press down on the Shutter button.The instant photo prints.
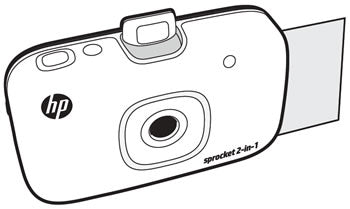
Frequently asked questions (FAQs)
Review the following list of frequently asked questions about using the Sprocket in Camera Mode.
What if I cannot print an instant photo?
Sometimes an instant photo does not print. Check the following:
-
The Viewfinder is open.
-
The Sprocket is charged and turned on.
-
HP Sprocket Photo Paper is loaded with 10 sheets or fewer.
-
The Sprocket firmware is up-to-date.
For detailed troubleshooting steps, go to Sprocket Does Not Print.
What can I do to improve print quality?
Try these recommendations and procedures to help improve print quality.
-
Use genuine HP Sprocket Photo Paper.
-
Make sure the lighting is sufficient to clearly see the subject of your photos.
-
Clean the paper path rollers with the blue Print Quality Card (formerly Smartsheet).
-
Allow the Sprocket a few minutes to cool down between print jobs.
-
Store the photo paper in a cool, dry place and avoid contact with water.
-
Use clean, wrinkle-free photo paper.
-
Make sure the Sprocket firmware is up-to-date.
For detailed troubleshooting steps, go to Improving Print Quality.
Why is my printout blank?
The HP Sprocket Photo Paper is loaded incorrectly. The photo paper must be loaded into the input tray with the HP logos facing down.
-
Turn off the Sprocket.
-
Remove the paper cover by sliding it away from the output slot, and then set it aside.
-
Slide the paper cover
-
Remove the paper cover
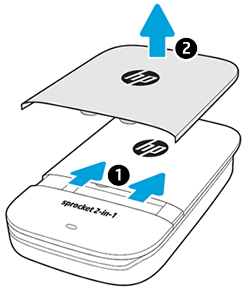
-
-
Remove any loose photo paper from the input tray.
-
Reload the HP Sprocket Photo Paper with the blue Print Quality Card (formerly Smartsheet). Make sure the blue card is on the bottom of the stack with the barcode facing down, and the HP Sprocket Photo Paper with the HP logos facing down.
note:
Keep the blue card until you are done with all 10 sheets, and then discard it.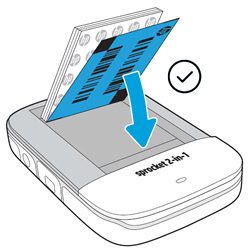
-
Close the paper cover by aligning it with the tracks on the outside of the printer, and then sliding it toward the output slot until firmly seated.
-
Turn on the Sprocket, and then resend the print job.
How do I transfer photos from the Sprocket to the computer?
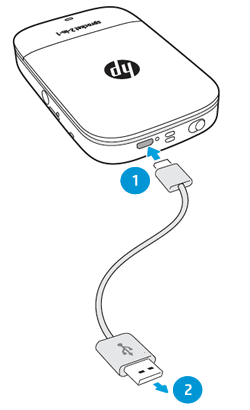
You can use the USB cable that came with your sprocket to connect and transfer photos to your computer. To save and transfer instant photos taken with the camera, a microSD card must be installed.
-
Connect the cable to the Micro-USB Charge Port, and then connect the other end of the cable to a computer USB port.
note:
You cannot print with the Sprocket while it is connected to the computer.-
Connecting the cable to the Micro-USB Charge Port
-
Connecting the cable to a computer USB port
-
-
On your computer, use a file browser, such as File Explorer (Windows) or Finder (Mac), to locate the Sprocket removable storage drive.
-
Windows: Open File Explorer, and then click Computer or This PC from the navigation column. Select the removable storage drive under the Devices with Removable Storage or Devices and drives section. If the microSD card has not been given a name, the removable storage drive might only show up as a letter, such as (D:).
-
Mac: Open Finder, and then locate the removable storage drive under the Devices section. If the microSD card has not been given a name, the removable storage drive might show up as NO NAME.
-
-
Browse the drive folders to locate the photos you want to transfer, and then transfer the photos into a folder on the computer, such as Pictures or Documents.
-
Turn off the Sprocket, and then disconnect the cable from the computer.
What paper sizes are supported?
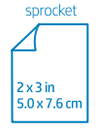
The HP Sprocket 2-in-1 supports 5.0 x 7.6 cm (2 x 3 in) HP Sprocket Photo Paper.
Where can I go for more information?
For more information, go to the HP Sprocket homepage.
Please help us improve by providing feedback on your experience with the document.
Examples: "Sprocket paper jam", "Sprocket firmware update"
Language:
English
- Arabic (العَرَبِيَّة)
- Chinese Simplified (简体中文)
- Chinese Traditional (繁體中文)
- Dutch (Nederlands)
- English
- Finish (Suomi)
- French (Française)
- German (Deutsche)
- Greek (Ελληνικά)
- Hebrew (עִברִית)
- Italian (Italiano)
- Japanese (日本語)
- Korean (한국어)
- Polish (Polski)
- Portuguese (Português)
- Russian (Русский)
- Spanish (Español)
- Sweddish (Svenska)
- Turkish (Türkçe)
HP Sprocket
- Privacy|
- Terms of Use|
- End User License Agreement
- Cancer and Reproductive Harm - www.P65Warnings.ca.gov
HP Sprocket Panorama
- Privacy|
- Terms of Use|
- End User License Agreement
© Copyright C&A Marketing, Inc. is the manufacturer of the HP® Sprocket®, under license from HP, Inc. HP and Sprocket trademarks are owned by HP Inc. or its affiliates. ZINK® Technology and ZINK® Trademarks are owned by ZINK Holdings LLC., used under license.

 Diagnostic


