
 Diagnostic
There are 0 items in your cart
View all items >Sub-totalbefore tax & fees
$0.00

What You’ll Need:
Once you’ve gathered all your materials, choose about 8 photos from your smartphone’s camera roll, and add them to the queue in the HP Sprocket App. Here you can edit, add filters, put in a framing border, crop, or add seasonal accents (snowflakes, candy canes, wreaths, and more) to the photos you wish to feature in this project. Now you’re ready to create.
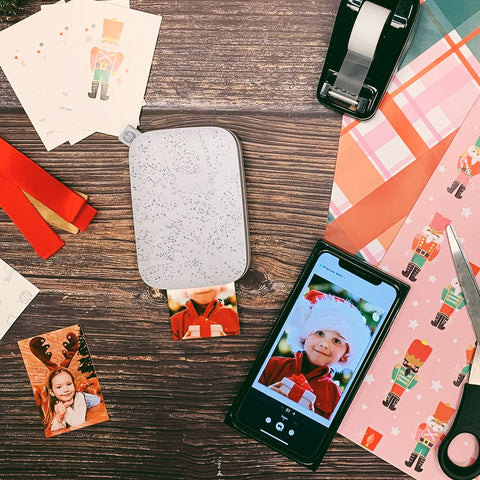
STEP 1:
Go through the photos you wish to use for this project, again, you should choose about 8 of them. Load them into the free HP Sprocket App and decorate them appropriately. There you can edit, crop, or add holiday themed accessories) to your photos. Once chosen, edited, and designed, print your pictures with the HP Sprocket Printer on the HP Zink Zero Ink Paper. Give yourself some options and print out some different photos and you might want to print a second copy of each picture, just as a back-up, in case a mishap occurs.

STEP 2:
Pick out the perfect wrapping paper you wish to use. After that, choose which gift you wish to wrap, like the HP Sprocket Photo Printer, for example.

STEP 3:
Align your gift on the wrapping paper to measure where to cut. Use a pencil to mark the exact spot you wish to cut. Be sure the cut you are measuring can cover the gift you are wrapping. To make sure, measure your cut mark twice.

STEP 4:
Carefully cut the wrapping paper from the spot you marked and measured with the scissors. Use a straight edge item, like a ruler or hard book cover, to guide your scissor and make sure your cut remains straight. You may want to cut a few extra strips, just in case of a misstep.

STEP 5:
Place your gift in the center of the wrapper paper section you’ve just cut from the roll. To make it tight and neat, make sure the edges are folded around your gift. Ensure that the gift is completely covered. If it is not fully covered, repeat STEP 4. Make sure the two ends of the wrapping paper overlap over the gift. Take a piece of tape and tape the wrapping paper so it remains in place over the gift. Fold the sides of the wrapping paper in on itself and tape it to the back of the wrapping paper and repeat for the opposite side. Remember, if you’re doing it correctly, you only need three pieces of tape to wrap any gift.

STEP 6:
Drape the wrapping ribbon horizontally across the top of the box. Leave about 4” to 8” hanging off the side for the tail of the bow. Do not cut the ribbon yet. Pull the rest of the ribbon under the box and back to the front. Don’t flip the box over, or you may lose your place. Instead, lift the box up and bring the rest of the ribbon behind it. Set the box back down once the ribbon comes out the other side. Cross the ribbons across the front of the box. Bring the ribbon towards the middle of the box, then bring the shorter end to meet it. Twist the ribbons around each other so that they are oriented. Now cut the ribbon.

STEP 7:
Once cut, fashion the knot into an ornate bow. Fold both ends of the ribbon into loops. Cross the left loop over the right one to make a smaller loop in the middle. Pull the left loop through that smaller loop, then pull to tighten. Adjust the bow, then trim off the excess ribbon. Take a moment to adjust the loops and the tails. If you used a wired ribbon, you could fluff the loops up as well. For a fancier touch, cut the ends of the tails into angles or V’s.

STEP 8:
Grab your gift tag. To really stand out, create your own by either drawing a unique gift tag or add stickers to your regular gift tag. Make sure you choose a gift tag that your photo will fit on.

STEP 9:
Take the photo you printed on the HP Sprocket Printer with HP Zink ZERO Ink Paper with Sticky Back and peel the back off the photo, exposing the adhesive, sticky portion of the photo.

STEP 10:
Make sure your gift tag and photo are right side up. On the back of the gift tag, carefully place your photo printed on the HP Zink Zero Ink Paper, sticky side down. Make sure your photo is flush and flat on the back of the gift tag.

STEP 11:
Flip the gift tag over and write a personalized message. If you can, write a fun note to the loved one you’re giving the gift to.

STEP 12:
Place the gift tag on the gift. Use the ribbon to hold the tag in place. Now give the gift and watch them enjoy every aspect of their gift.

HP Sprocket
HP Sprocket Panorama
© Copyright C&A Marketing, Inc. is the manufacturer of the HP® Sprocket®, under license from HP, Inc. HP and Sprocket trademarks are owned by HP Inc. or its affiliates. ZINK® Technology and ZINK® Trademarks are owned by ZINK Holdings LLC., used under license.


