
 Diagnostic
There are 0 items in your cart
View all items >Sub-totalbefore tax & fees
$0.00
Photos of friends and family add to the pleasantness of your home. Showing off funny moments, great achievements, or formal portraits are a great way to remind us of what we are thankful for this Thanksgiving season.
Looking for a DIY photo display for your Thanksgiving table? Celebrate these touchstones with this unique fold out photo album that'll tastefully impress your loved ones, while warming their hearts.

Creating this keepsake will allow you to gather photos of your loved ones while reliving these snapshots of life, and even finding some you've completely forgotten. It is also a stylish, unique way to exhibit those you cherish to accentuate any Thanksgiving dinner table. Spend the holiday with smiles and laughter as you revisit these memories with those you care about.
WHAT YOU NEED:
Once you've gathered all your materials, choose about 8 photos from your smartphone's camera roll, and add them to the queue in the HP Sprocket App. Here you can edit, put in a framing border, or crop the photos you wish to feature in this project. Now you're ready to create.
STEP 1:
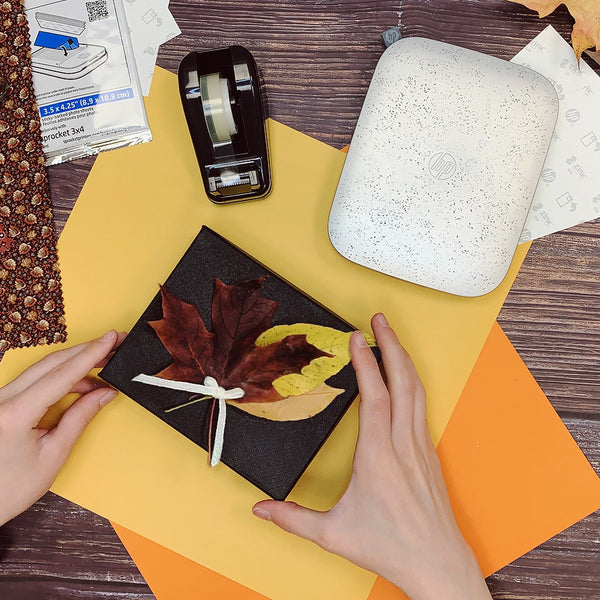
The box is going to be the first thing anyone sees, make it pop with seasonal warmth. Pick a box color that matches your sensibility. If you wish to paint the box, allow the paint to dry before moving on to the next step. Glue or tape the decorative leaves to the top of the box lid to highlight the season.
STEP 2:
Print out a few photos to give yourself options. Connect your smartphone or tablet, via Bluetooth, to the HP Sprocket 3x4 Printer to begin printing. You may want to print out a few copies of each photo, in the event of a mistake.

STEP 3:
Align your photos on the craft paper to measure where to cut. Use a pencil to mark the exact spot you wish to cut. Measure enough space on the craft paper for the photos to fit completely. Also, be sure that the cut you are measuring can fit inside the box you have designed.

STEP 4:
Carefully cut the craft paper from the spot you marked you measured with the scissors. You may want to cut a few extra strips, just in case of a misstep.

STEP 5:
Repeat steps 3 & 4 for as many photos you wish to display.

STEP 6:
Use the photos again to measure where on the newly cut strips of paper you will fold. Mark it with a pencil so you know the exact spot. Just like measuring on where to cut the paper, make sure you give yourself enough space for paper to be neatly folded without creasing or damaging your photos.

STEP 7:
Carefully fold the craft paper where you marked with the pencil. Fold as many times as you need, depending on the number of photos you wish to display.

STEP 8:
With your glue or tape, attach the folded paper together. Apply the adhesive to the back on the top margin of one piece of paper and stick it to the front, bottom region of another piece of paper. Match the corners of each piece of paper to align properly. Repeat this step until all the paper is attached in a single, accordion-like strip of paper and allow to dry completely.

STEP 9:
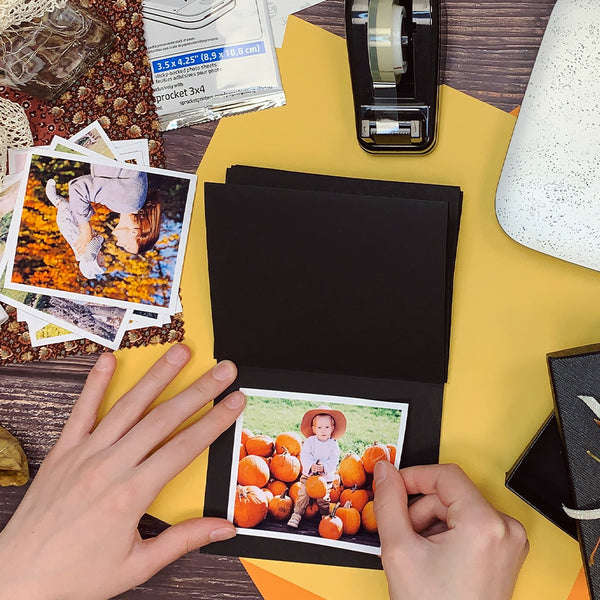
Take the photos you printed from the HP Sprocket 3x4 Printer and decide the order you wish to show them. Place the photo on the folded craft paper to ensure they will fit accordingly. Once you've chosen your order, peel the backing of the HP Zink Photo Paper to expose the sticky backing of the picture.

STEP 10:
Gently place the photos you have chosen, sticky side down, and make sure it's flush and flat to the paper. If a problem occurs in this step and a photo is damaged, use a spare photo you printed to replace the damaged picture.
STEP 11:
Review your photos and ensure they are all in their proper order and laid out to your liking. If they are not, replace the photo with a spare.

STEP 12:
Place tape, or glue, on the back of craft paper you wish to attach to your newly designed box. This piece of paper will be the last section in your photo train that doesn't leave the box.

STEP 13:
Place the paper, adhesive side down, on the bottom of the decorative box you designed. Make sure your craft paper is completely flat against the bottom of the box to ensure a smooth, sleek appearance. Allow the adhesive to completely dry before you fold your photo sheets on top and close the box.

STEP 14:
And you're finished! Take a moment to admire your project then give this to someone you care about or display it for all to see.

Now that your creativity thoughts are flowing, it's time to make them come to life. The HP Sprocket 3x4 Printer is just one of the tools you need to make these ideas a reality. The crisp, clear, fast, and sharp printing will capture your beautiful moments the way you want to see them. Do your memories justice with DIY crafts you can create with the eloquent photos from the HP Sprocket 3x4 Printer.

HP Sprocket
HP Sprocket Panorama
© Copyright C&A Marketing, Inc. is the manufacturer of the HP® Sprocket®, under license from HP, Inc. HP and Sprocket trademarks are owned by HP Inc. or its affiliates. ZINK® Technology and ZINK® Trademarks are owned by ZINK Holdings LLC., used under license.


